Data Trace Selection
There are three basic means of selecting plotted traces.
1. Probing directly from the schematic
2. Menu command Plot Settings=>Visible Traces
3. Menu command Plot Settings=>Add Trace
The undo and redo commands allow you to review the different trace selections no matter which method of selection is used.
1. Probing directly from the schematic:

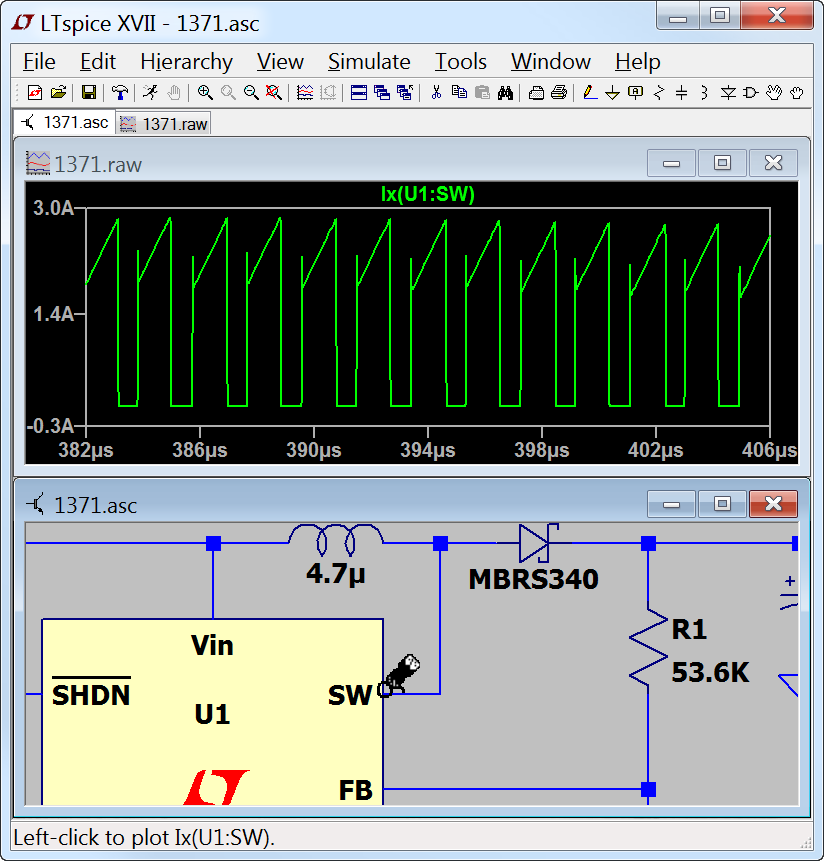
The easiest method is to simply probe the schematic. You simply point and click at a wire to plot the voltage on that wire. You can plot the current through a component with two connections(like a resistor, capacitor or an inductor) by clicking on the body of the component. This works at any level of the circuit's hierarchy if you've saved all subcircuit voltages and currents. You can also plot current into a particular pin of a component by clicking on that pin of the symbol.
If you click the same voltage or current twice, then all other traces will be erased and the double clicked trace will be plotted by itself. You can delete individual traces by clicking on the trace's label after selecting the delete command.
The following screen shot shows how to point at a pin current. Notice that the mouse cursor turns into an icon that looks like a current clamp meter when it's pointing at a pin current. By convention, the current is reported positive if flow is into the pin.
It is also possible to point at voltage differences with the mouse. You can click on one node and drag the mouse to another node. You will see the red voltage probe at the first node and a black probe on the second. This allows you to differentially plot voltages:

Yet another schematic probing technique is to plot the instantaneous power dissipation of a component. To do this, hold down the Alt key and click on the body of the symbol of the component. The instantaneous power dissipation will be plotted as an expression of voltages and currents. It will be plotted on its own scale with the units of Watts. The mouse cursor turns into an icon that looks like a thermometer when it's pointing at a dissipation that can be plotted. You can find the average power dissipation by control-clicking the trace label.

You can also probe the current in a wire. To do this, hold down the Alt key and click on the wire. The mouse cursor turns into a current clamp meter to indicate it's pointing at this current and the red arrow shows the direction of positive current.

2. Menu command Plot Settings=>Visible Traces:
Notice that it is possible to list only those trace names that match a pattern. This is useful when there are many traces and you only know part of the name.
The menu command Plot Settings=>Visible Traces is the dialog seen at the beginning of plotting data from a simulation. It lets you select the initial traces to start the plot. It also gives you random access to the full list of traces plotted.

3. Menu command View=>Add Trace:
The Plot Settings=>Add Trace command is similar to the Plot Settings=>Visible Traces command. However, you can not delete traces that are already visible with it. It has two useful capabilities. One is an edit box near the top of the dialog that allows you to enter a pattern of characters. Only trace names that match the pattern will be shown in the dialog. This is very useful for finding a trace when you can only partially remember the name. Also, it's a bit easier to compose an expression of trace data because you can click on a name in the dialog instead of typing out its name.
